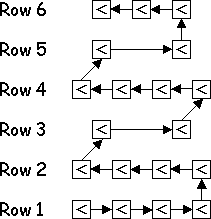
For now at least, the start and stop nodes are unmarked, and
therefore interchangeable.
There are six rows in the network (not counting the start/stop
rows). Row 1 is the first row that people encounter; row
6 is the last.
There are five different lengths of ropes, color coded, and
46 ropes in all:
Rope color
Length (ft)
How many
Black
10
30
Blue
15
6
Yellow
21
4
Green
27
2
Red
32
4
People walk through a node or along a rope from back
to front. Always in the back and out the front.
1. Lay out the comparator nodes
Make the rows about 10 feet apart, and the nodes about 10 feet
apart within a row. Three big steps is a pretty good working estimate
for 10 feet.
There's a label on the underside of each node indicating its row
and position.
Place each node face up, with the label toward the front (though
hidden underneath). The "less-than" symbol ('<') on top
will be "pointing" to the left (open to the right).
You can lay the nodes out easily in order by walking the
following pattern, if the last person who packed it up did so
correctly (according to the disassembly instructions below):
For the diagonal arrows, walk about 4 steps; or go 3 steps
forward and 1.5 steps over.
For the long arrows, walk about 6 steps.
2. Lay out the ropes
The ropes are wrapped around the start/stop nodes for storage.
There will probably be several ropes around a particular node.
Use the map to determine which ropes
connect which nodes. There are colored stickers on the nodes to
indicate where ropes should be connected.
White ropes (no colored tape) are the same as black ropes (black
colored tape). We just haven't finished putting black tape on all the
black ropes yet.
It doesn't matter in what order you lay out the ropes; only
that they end up in the right places.
3. Connect and tighten the ropes
It's easiest to connect the ropes in the following order:
Front of Row 1 (of comparators) to back of Row 2
Front of Row 2 to back of Row whatever (they vary)
Front of Row 3 to back of Row 4
Front of Row 4 to back of Row whatever (they vary)
Front of Row 5 to back of Row 6
Each time you finish the back end of a node, pull the node
forward so that the ropes are taut.
You may have to shift the nodes sideways a little to keep them
straight while tightening the ropes.
Because the lengths of the ropes are not exact, the final
network will not have exactly the same shape as seen in the map.
Be careful not to pull the previous nodes out of alignment.
4. Lay out the start/stop nodes
Lay out the start and stop nodes according to
the map.
Pull the nodes away from the network so that the ropes are
taut.